
The girls of Stitches Coven with Instructor Leigh-Anne Treadwell, showing off the finished chairs, the stool and ottoman lid.
We were delighted to invite Leigh-Anne to deliver a workshop for us on the skills of upholstery renovation. For most of the group this was a step into a completely new zone of textile creativity.
"Leigh-Anne, graduated from U.W.E Bristol with a degree in Fine Art in 2005. Since then, she has become an important part of the Arts community in South Wales, Bristol, and now South Devon inspiring, teaching and connecting people through creativity, expression and re-skilling".


Good upholstery 'DIY' books exist but the benefit of hearing about the tools and materials first-hand from a professional, is truly incalculable. Leigh-Anne brought those books to life with her patient explanation and answers. The careful explanations helped novices and experienced alike.
"The 'tricks' that Leigh-Anne taught us will be valuable in all the textile work that we do in the future." ~ Angela Bliszko
Before our recycling adventure began little did we know but hard labour was now upon us. Before beginning any reupholstery project the existing fabric and innards of the chair or sofa, have to be removed, and this was no joke, as the staples or tacks have to be forcefully removed using the appropriate tools.
Huge amounts of effort were needed to do this and I for one was totally amazed to see just how many tacks had to be gone, before I could begin: I think I counted between 60-70 in my average-sized seat pad.
Huge amounts of effort were needed to do this and I for one was totally amazed to see just how many tacks had to be gone, before I could begin: I think I counted between 60-70 in my average-sized seat pad.


Diane was well ahead of the game, she'd brought her husbands pincers with her! This made it much easier to grip the difficult tacks and staples. 10 out of 10 for ingenuity Diane.

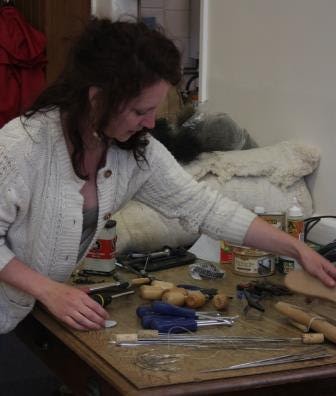
Very important to note here that you hold the implement and push away from you to remove the tacks, else you might end up stabbing yourself. Oooch! In the photo Donna demonstrates the perfect technique.
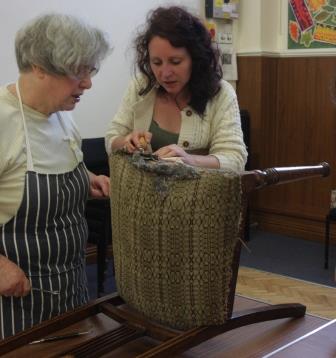
Below you can see that poor Karen had to remove the springs from hers too. She chose not to replace them with new springs, but structured it for comfort nevertheless by installing professional webbing.

I noticed that Karen's seat pad frame was slightly curved too, which made it difficult to work on so the answer, supplied by Leigh-Anne, was to clamp it to the surface of the table.

Despite having the springs to remove Karen worked very quickly and soon she was way ahead of us all.

Gwyneth's chair was the oldest and trickiest to recover because it wasn't a standard drop-in seat pad. And Angie summed it up succinctly when she said:
"Gwyneth's chair was like taking a walk back in history." Angie Bliszko.


The webbing is the support for all the gubbings in the seat pad, without it everything would fall out of the bottom of the seat. Think of it as the floorboards that everything else sits on. Here's Karen on the first step of her webbing job.


In the photo below Leigh-Anne is showing us the 10mm tacks which will be used to secure the webbing. You can also see the tool which is used to stretch the webbing to the max. It has a stepped edge to it which can be used to lever the tool against the surface of the workbench or table, helping to achieve a taught finish.


This photo above shows that levering action with the tool against the edge of the table. See how taught the webbing is, then it is secured with a tack.

Let the weaving process begin.

The ottoman didn't require any webbing, but many of us did have chairs that required it.

Leigh-Anne chose to work on Andrea's ottoman lid for the demonstration on how to 'attach the hessian'.
We gathered round to see Leigh-Anne demo the 2nd step: attaching the hessian to the top of the lid. The hessian is the base to which all the horsehair wadding will be attached.
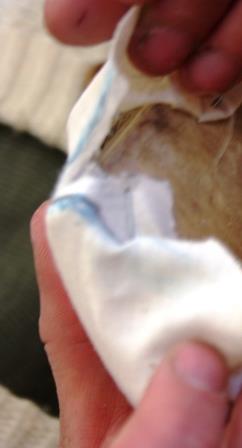
The edges are folded inwards and tacks used to keep it in place.


Angie found it more comfortable to sit on her harpist stool while sewing the saddle stitch.


Brenda's chair was the smallest - it was a typical kitchen chair. You can see the very precise and neat job she did when you look at the main group photo. Brenda's chair is the tiny one in the front row 3rd from the left.

THE WADDING
Into the loops made by weaving the saddle stitch into the hessian, a horse/hog hair mix was stuffed. This gives the chair the resilience when bottoms approach. In other words it is what provides the comfortable padding.

The twine is inserted into a curved needle and at a hand's distance apart it is sewn along the length of the ottoman cover. Here it is important to use the saddle-stitch and work in a left-to-right, then right-to-left movement so that the twine can be pulled to secure the horsehair when it is stuffed under the twine.

For one average seat pad you will require approx 500gms of horse/hog hair. If you want your seat pad to be even bouncier you will need 750gms.


Here Karen Davies looks like she's puzzling over just how much of the horse hair wadding she'll need to use. Estimating the quantity to use is something that comes with experience, but better too much than too little.
THE PADDING LAYER
This padding or 'porridge' as Leigh-Anne affectionately referred to it, is really soft to the touch. It is 100% cotton so yet another totally eco-friendly ingredient goes into the seat-pad.


Assessing the quantity of 'porridge' to use.

THE CALICO COVERING
Assess, in exactly the same way, how much calico to use to hold the 'porridge' in place. No more than half an inch is required for the hemming.


Angie's harpist stool.
This is what Angie had to say about her piece:
"I saw this 3-legged stool at a car boot sale and was instantly drawn to it. Who would use such a drab stool? I felt quite sorry for it and thought I couldn't make it look any worse, so here is my attempt at up-cycling with Leigh-Anne's wonderful guidance."


Gwyneth's pseudo Regency dining chair.


Tacking the calico in place. This is an extremely noisy process.

Or, stapling the calico in place.

Here's the corner fold.

Mark then remove all the unnecessary fabric from around the corner, else the seat pad will not fit back into the chair.

As much fabric as possible has to be cut away from the corner so that it looks neat.
Gwyneth's chair, not having a drop-in seat-pad, required more skill in cutting the calico to the perfect size around the framework. Here the Y-cut came into play. It is important once again the remove as much of the fabric as possible so that the covering looks neat.


Now here's the great thing about this group, there are no BIG egos to handle, everyone shares and encourages everyone else. This is so for weekly sewing sessions held at Hazel Court, Sketty Park and workshops alike. There is a genuine warmth and desire to be helpful. Sharing skills is something which permeates.

The last leg of the renovation process involves cutting the finishing fabric to size and attaching in precisely the same way the calico was fixed. Now the importance of removing the excess corner fabric is totally understood.
THE FINAL STAGE
As if by magic we all appeared to be approaching the finish line at the same time despite working on hugely differing upholstery jobs. Seeing the variety of seat pad shapes, and the new fabric coverings chosen in this recycling project was very stimulating and exciting.
Brenda's project was to revive a tired kitchen chair seat pad.
Diane had two dining room chair seat pads to tackle and so Donna assisted with the 2nd one.
Donna summed up her experience, thus:
"I found the upholstery techniques to be surprisingly more satisfying and enjoyable than I anticipated, and this is in no small part due to Leigh-Anne's expert tuition and patience."
Angie's project was the most unique: she had rescued a triangular-shaped stool from a car-boot sale, and we thought it was probably a harpists stool, though who knows what it was used for?


"I think the stool would be wonderful for a Harpist who today are very popular at Weddings. With my inspiration for the covering fabric was taken from 'sea foam'. The piece of textile is created an embellisher to agitate fabrics and materials in the same way that sea creates it's foam."
"This was a wonderful traditional upholstery and furniture restoration workshop. My stool is now packed with traditional fabrics, hessian, horse hair, cotton and wool wadding. Not a piece of foam inside, it's all on the outside 'Sea Foam'!" ~ Angie
Andrea had brought in the lid of a bedroom ottoman.
Karen C was tackling a dining chair which originally had springs. This was a typical 1950's dining chair and Karen transformed it into a very comfortable chair for her sewing room. She added a padded back cushion decorated with applique hearts in what I can best describe as Welsh wool check. This is how she summed up the workshop experience:

"A fantastic day led by a calm, generous and knowledgable tutor. I have always dabbled in up-cycling vintage furniture but now those books I've bought on how to do it really make sense. Look out, next project, my dining chairs!"
Gwyneth's chair proved to be the most complex due to the fact it was a seat pad that required the fabric to extend over the edges of the chair, rather than being tucked neatly away under the seat pad.
Karen D worked on a regular drop-in seat pad from a dining chair. Her new fabric covering was akin to a Welsh blanket: a pure wool check. You can see her masterpiece in the group photo, back row 1st left.
And mine was similarly straight-forward.
What I had chosen to do was prepare a bespoke fabric covering made from applique, and cut-back applique with beading. The theme of the textile design is 'the ocean' and it features seaweeds, fish and a sea urchin. The shimmering ocean effect was achieved by adding organza as a top layer. It gave the desired effect and provides protection for the delicate beading. This is the finished chair and seat-pad:


A quick piece of advice for anyone planning to use this technique for covering a seat-pad. The cutting away of fabric at the corners is crucial because with so many layers of fabric used for the cut-back applique technique it means there is lots, and lots to remove, in order that the seat-pad can once again fit into the chair.
A huge debt of gratitude is owed to Leigh-Anne for driving all the way from Devon to deliver this workshop. In 'adult education classes' the demeanour of the tutor is a crucial element in the success of the learning opportunity. Leigh-Anne is a treasure: she's an exceptionally skilled tutor who paces the delivery of information and skills tutoring perfectly to match the audience.
Thank you so much for a fun-filled day where expectations were exceeded and finished results spoke volumes about the quality of the teaching.